Designing a luxury outdoor living space for year-round use in the Bay Area requires balancing the region's microclimates, marine layer, and mild winters with smart material choices, layered heating, and weather-adaptive structures. The right combination of covered pergolas, radiant heat, durable hardscaping, and outdoor kitchens can make your backyard genuinely livable through every season.
Most Bay Area homeowners underestimate how dramatically conditions shift between a foggy Daly City afternoon and a sun-drenched Los Altos evening. The challenge isn't surviving harsh winters; it's designing around inconsistency. Wind, moisture, and shade patterns vary street by street, which means a generic outdoor design will fail you at least half the year. Getting it right means planning for all of it.
Key Takeaways
- Bay Area microclimates vary significantly across neighborhoods, so your design must account for your specific site's wind exposure, fog frequency, and sun angles before selecting materials or structures.
- Layered heating, combining overhead radiant panels with a gas fire feature, extends usable outdoor hours far more effectively than a single heat source alone.
- Material selection is critical: teak, IPE, powder-coated aluminum, and porcelain pavers consistently outperform alternatives under coastal humidity and UV cycling.
- A fully integrated outdoor kitchen with a covered, ventilated roof structure turns seasonal entertaining into a year-round lifestyle, not just a summer amenity.
- Adjustable shade systems, such as motorized louvered pergolas, solve the competing demand for summer shade and winter sun without locking you into a fixed configuration.
- Budgets for a complete luxury outdoor living space in the Bay Area typically range from $80,000 to $250,000 or more, depending on site complexity, materials, and scope.

Why Bay Area Microclimates Change Everything
The Bay Area is not one climate, it's dozens layered on top of each other. Hillside properties in Saratoga or Los Gatos can be 15 to 20 degrees warmer on a summer afternoon than a home two miles west toward the coast. That temperature differential determines whether you need shade more than heat, or heat more than anything else.
Coastal-facing properties in Half Moon Bay, Pacifica, or the western edges of San Jose deal with persistent marine layer and salt-laden air that accelerates material degradation. Inland East Bay communities like Pleasanton or Danville face intense summer heat, dry conditions, and very mild winters. Both situations demand a tailored approach, not a one-size-fits-all outdoor room.
Studies on Bay Area residential outdoor projects consistently show that homeowners who don't account for microclimate during design report lower satisfaction and require expensive retrofits within three to five years, particularly around shade structures, drainage, and heating placements that weren't sized for actual site conditions.
Before any design decisions are finalized, a site analysis should map prevailing wind direction, average fog coverage by month, and the sun's path across the space during December versus June. These aren't optional details; they're the foundation every other decision rests on.
What Structures Actually Hold Up Year-Round?
A freestanding patio cover without proper engineering for wind uplift is one of the most common and expensive mistakes luxury outdoor projects make in the Bay Area. Coastal and hillside properties can experience sustained winds well above 30 mph, and structures that feel solid on a calm day can become hazardous or damaged quickly without proper anchoring and lateral bracing.
The most durable and functional structure for year-round use is a motorized louvered pergola with integrated gutters and optional side screens. This system allows you to open the louvers flat for full sun in winter, close them during rain, and angle them for ventilation and shade in summer. Higher-end versions include built-in LED lighting and heating channels within the louver frames themselves.
Motorized louvered pergola systems from premium manufacturers typically cost between $15,000 and $45,000 installed, depending on span size, motor count, and add-on features like integrated heating or retractable screens. Custom powder-coated aluminum finishes carry a 10 to 15 year warranty under standard residential conditions.
For homeowners who want a more architectural feel, a solid insulated patio roof tied directly to the home's structure offers the cleanest integration with existing rooflines and allows for recessed lighting, skylights, and proper ceiling insulation ,elements that make the space feel like a genuine room extension rather than an add-on.

Step-by-Step: Planning Your Year-Round Outdoor Living Space
- Conduct a microclimate site analysis. Document sun angles, prevailing winds, fog frequency, and drainage patterns specific to your lot. This shapes every subsequent decision and prevents costly mismatches between design intent and real conditions.
- Define your primary use cases. Decide whether the space will be used more for casual daily living, formal entertaining, or both. A family that eats outside nightly needs different infrastructure than one that hosts quarterly dinner parties for twenty guests.
- Design the overhead structure first. The roof or pergola system sets the footprint, load requirements, and utility rough-in locations for lighting, heating, fans, and audio. Getting this right early avoids expensive retrofits later.
- Plan utilities before any hardscaping. Gas lines, electrical conduit, water supply for the outdoor kitchen, and drainage lines all need to be trenched before the patio surface is poured or laid. Skipping this step is one of the most common and costly mistakes in outdoor renovations.
- Select materials based on your microclimate zone. Coastal properties need corrosion-resistant hardware and UV-stable finishes. Inland hot-zone properties need materials that don't retain excessive heat underfoot or crack under thermal cycling.
- Layer your heating and comfort systems. Combine ceiling-mounted radiant infrared heaters with a gas fire feature and, where wind exposure is high, glass or cable wind screens. No single source handles all Bay Area conditions on its own.
- Design the kitchen for the actual cooking you do. A built-in grill with side burners suits most households. Adding a pizza oven, refrigeration, sink, and kegerator is worthwhile only if the use pattern genuinely supports it. Over-spec outdoor kitchens are a common budget trap.
Which Materials Actually Survive Bay Area Conditions?
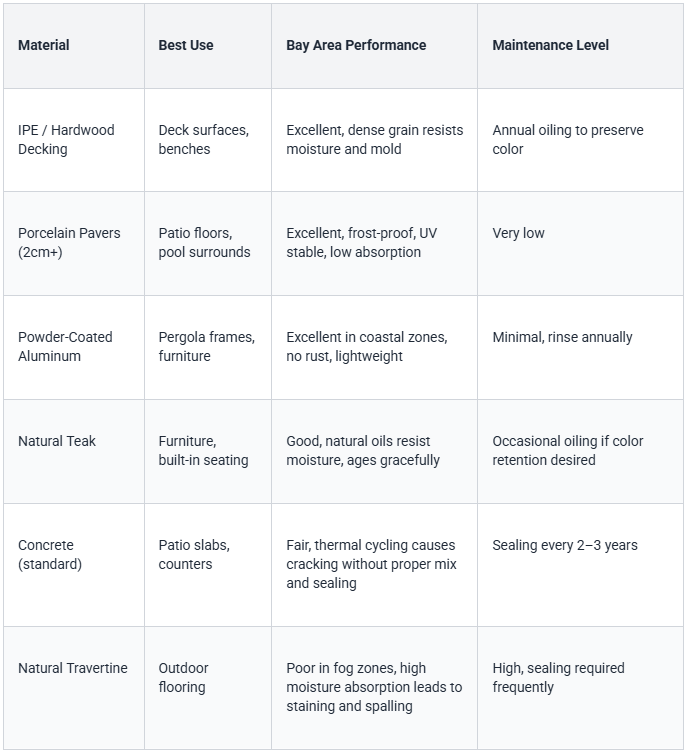
One pattern that comes up repeatedly in Bay Area outdoor renovation projects: homeowners choose travertine or unsealed natural stone because it photographs beautifully, then spend the next five years fighting staining, biological growth, and surface deterioration in anything within 10 miles of the coast. Porcelain pavers with a natural stone finish deliver the same visual result with a fraction of the maintenance burden.
How Should You Think About Heating a High-End Outdoor Space?
The instinct to install a single statement fire pit as the primary heat source is understandable; it looks spectacular. In practice, a fire pit or fire table provides radiant heat within roughly five to six feet and requires guests to gather around it. For a dining setup or a larger lounge area, you'll need ceiling-mounted infrared heaters to genuinely warm the space.
Ceiling-mounted electric infrared heaters are cleaner and easier to install in a covered structure, while gas-fired overhead heaters output more BTUs and perform better on windy nights. In spaces with significant wind exposure, the combination of a solid or semi-solid wind screen on the prevailing wind side plus ceiling heat makes the biggest practical difference in usable hours per year.
High-output ceiling-mounted gas heaters rated at 40,000 to 60,000 BTUs typically cost between $800 and $2,500 per unit before installation. For a 400-square-foot covered outdoor space, two to three units placed on a thermostat-controlled system can maintain comfortable temperatures down to approximately 35°F on calm nights and 45°F with moderate wind.
Think about outdoor comfort as a layered system rather than a single solution. The goal is to have no single point of failure ,if the wind kicks up, your screens and ceiling heat compensate. If fog rolls in cold, the fire feature adds ambiance while the infrared handles the actual thermal load.

What Makes an Outdoor Kitchen Truly Year-Round?
An outdoor kitchen that only works when it's dry and calm isn't a year-round amenity ,it's an expensive seasonal appliance. The difference between a kitchen that gets used 40 nights a year and one that gets used 200 nights a year almost always comes down to whether it's covered, ventilated, and oriented correctly.
The kitchen island itself should be oriented so the primary cook faces into the space rather than away from guests, and positioned so prevailing winds carry smoke and heat away from the seating area, not into it. This sounds obvious, but it's one of the most frequently ignored details in outdoor kitchen placement, and it determines whether the space is genuinely pleasant to use in real conditions.
A complete luxury outdoor kitchen in the Bay Area, including a built-in grill, refrigeration, sink, countertops, and cabinetry in a weather-resistant frame, typically runs between $25,000 and $80,000 installed. Adding a pizza oven, kegerator, or full ventilation hood pushes projects toward the upper end. Contractor lead times in the Bay Area for custom outdoor kitchen builds range from 8 to 20 weeks depending on material sourcing and permitting complexity.
For cabinetry, HDPE polymer frames or powder-coated stainless steel outperform wood alternatives in marine layer environments. Countertops in porcelain or granite hold up well. Avoid concrete counters without proper sealant and expansion control, as temperature fluctuation in covered-but-open spaces causes more cracking than most homeowners anticipate.
Pairing a well-designed kitchen with thoughtful luxury interior finish choices that carry through from the home's interior creates a cohesive aesthetic that feels intentional rather than bolted on. This visual continuity is one of the elements that separates a truly high-end outdoor space from a collection of nice individual pieces.
Common Mistakes That Undermine Year-Round Usability
- Skipping the drainage plan. Bay Area winters can bring significant rainfall in short periods. A patio without proper slope, channel drains, or permeable edges becomes a puddle and a slip hazard within the first wet season.
- Choosing furniture for looks over materials. Fabric cushions without UV-stable, mold-resistant covers deteriorate quickly in coastal humidity. Many homeowners replace patio furniture within three years because they prioritized aesthetics over weatherproofing at purchase.
- Installing a single heat source and calling it done. A fire table looks beautiful. It does not heat a dining table 12 feet away on a 48-degree night. Layered heating is not a luxury ,it's the reason the space gets used in winter.
- Underspecifying electrical. Outdoor kitchens, lighting, heaters, speakers, fans, and charging stations add up fast. Running a single 20-amp circuit to an outdoor space and expecting to add to it later means cutting open hardscaping. Plan capacity during construction.
- Building on a hillside lot without retaining wall engineering. Hillside properties are common in the Bay Area, and the temptation to cut corners on retaining wall design to save budget creates long-term structural and safety issues that cost far more to correct later.
- Ignoring permit requirements. Many outdoor structures, outdoor kitchens, and grading projects in Bay Area municipalities require permits. Unpermitted work complicates resale and can trigger costly corrections at the worst possible time.
What Does This Type of Project Cost in the Bay Area?
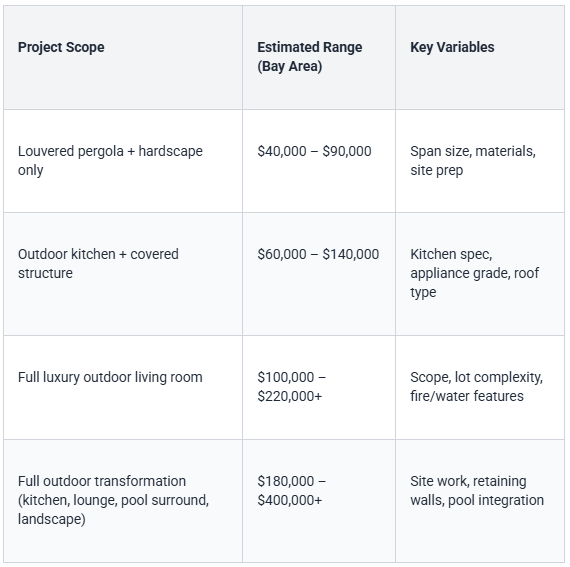
If you're weighing whether to invest heavily in your current property or consider a different path, understanding the tear down vs renovation decision in the Bay Area can clarify which approach delivers the best long-term return for your specific situation.
Nearby Bay Area Areas Where These Projects Are Common
Luxury outdoor living projects of this scope are active throughout the region. In the South Bay, communities like Los Altos, Saratoga, Cupertino, and Los Gatos have seen a surge in full outdoor room builds driven by post-2020 lifestyle shifts. In the Peninsula, Atherton, Menlo Park, Palo Alto, and Woodside regularly see high-spec outdoor kitchen and pergola projects tied to major home renovations. Across the East Bay, Danville, Alamo, Pleasanton, and Lafayette are similarly active markets. Each area has different permitting timelines, microclimate considerations, and contractor availability.
Frequently Asked Questions
How can I make my outdoor space usable in the rain?
A covered overhead structure is the non-negotiable foundation. A motorized louvered pergola or solid insulated patio roof keeps the space dry while maintaining airflow. Pairing the cover with channel drains at the patio perimeter and a slight slope toward drainage prevents water pooling. For spaces that face significant rain exposure, retractable side screens add a second layer of protection without making the space feel enclosed.
What heating options are best for high-end, windy spots?
For genuinely windy locations, ceiling-mounted gas infrared heaters outperform electric models because their heat output is less disrupted by air movement. Combining them with a glass or cable wind screen on the windward side of the space dramatically improves performance. A gas fire table or fireplace adds ambient warmth and works well as a supplemental source. Freestanding patio heaters are not recommended in high-wind conditions ,they're both less effective and a safety concern.
What materials survive the Bay Area climate?
For coastal and marine layer-exposed properties, powder-coated aluminum structures, porcelain pavers, IPE or teak wood, and stainless steel or polymer outdoor kitchen cabinetry have the strongest track record. Natural travertine, untreated wood, and iron hardware all tend to require more maintenance than most homeowners anticipate. Inland properties in hot-zone microclimates have more flexibility but should still prioritize UV-stable finishes and non-heat-retaining floor surfaces.
How do I create a kitchen that works all year?
A year-round outdoor kitchen needs three things: full coverage overhead, smart orientation relative to wind direction, and proper ventilation if it's under a closed or partially closed roof. The kitchen should be positioned so smoke and heat travel away from the seating area, not through it. Built-in refrigeration, a sink with winterized plumbing, and high-BTU burners rated for outdoor use are the functional core. Skipping any of these in the interest of budget usually means the kitchen gets used far less than anticipated.
How can I add shade without blocking winter sun?
A motorized louvered pergola is the most effective solution because it allows you to dial in exactly how much sky exposure you want at any time of year. In December, louvers open fully to let low-angle winter sun warm the space. In June, they close or angle to block overhead heat. Fixed pergolas with open slats offer a compromise but limit flexibility. Retractable fabric shade sails are a lower-cost alternative but don't perform as well in wind and require removal during winter storms in exposed locations.
Ready to Build a Luxury Outdoor Space That Works Every Month of the Year?
Designing a year-round outdoor living space in the Bay Area is genuinely achievable, but it rewards the homeowners who plan carefully and invest in the right systems from the start. The combination of microclimate-specific design, durable materials, layered heating, and proper structure engineering is what separates a space that gets used constantly from one that sits empty for six months a year.
Supple Homes Inc. works with Bay Area homeowners on exactly these kinds of projects ,from site analysis through construction and finish, with a focus on spaces that perform as well as they look. If you're ready to move forward or want to talk through what a project like this would involve for your specific property, call the team at (650) 649-4480.